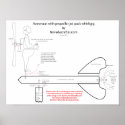
Whale whirligig / weathervane
This original design was conceived for use with the wood from fruit and vegetable crates that grocery stores discard, but due to the use of pesticides and other chemicals that may have been used on the wood I no longer use this wood source. The Woodstock that I use is 1/2" or 5/8 " and can be scaled to what ever size you need.
For the water spout I give you 3 options, although I used the copper wire the most as it was more cost-effective.
[Note] The difference between a whirligig and a weathervane is that a whirligig usually has a mechanical or electrical action to it, whereas a weathervane is usually just a figurine that tells the direction of the wind. A weathervane will also usually position the pivot post so that the figure( animal, person, object) is moving in the direction of the wind and not in the opposite direction. If you wish to use this as a weathervane simply move the pivot post back so that the whale will pivot as if he is traveling in the direction of the wind.
This is a simple basic design that can be modified numerous ways but it was made simple so as to increase profits and to allow me to compete with other crafters. The design can be spray-painted with one or two colors and not a lot of detail and still look good.
The fiber-optic version is a recent concept that I have not had a chance to fully work out. So if you attempt to create it please keep in mind that you may have to experiment with it in order to get it to work right. This version also increases the cost of materials which you may not be able to recoup even though all of materials for the lighted water spout can be found at dollar stores. The LED light is cannibalized solar yard light and the fiberoptics is cannibalized from a battery operated light.
Still, it is a good project to challenge your skills at whatever level you happen to be at. The whales design was originally cut from a single piece of wood with a coping saw, which was a lot of work to just cut out the tail and very imprecise. At the time a coping saw is all I had, but when I later invested in a scroll saw I found it to be a worthwhile investment. A scroll saw makes quick work of it in less than a couple minutes.