Translate

Showing posts with label crafting. Show all posts

Saturday, July 15, 2017

Double Pivot Bumble Bee Whirligig / Weathervane

Double Pivot Bumble Bee Whirligig / Weathervane  

As with any double pivot system, the location of the pivot determines how much action or how little action in the pivot takes place. Moving the pivot for the bumblebee forward or back will determine how much back and forth movement the bumblebee makes. If the pivot is placed in the middle of the bumblebee, the bumblebee will have a tendency to spin. You will also want to take into consideration that the bumblebee needs to clear the tail fin as it moves back and forth.
     The legs and antennae are made from wire and the eye can be a simple bicycle reflector. Tail fin can also be reflectors, cutouts, wood burned etching, or simply painted design. Of course as always the design can be scaled up or down depending on size whirligig that you need.  The bumblebee propeller wings are small, which is indicative of a bumblebee which has disproportionate wings to body size. The black body and orange stripes are whatever size and width that you desire.
    The overall design is a basic double pivot whirligig/weathervane. The concept can be used on any design or theme. I hope you enjoy this design concept, feel free to give positive creative feedback.
Always be sure to check out our website www.nevadacrafter.com as well as our other blogs.

Blog links
https://craft44.blogspot.com/

https://nevadacrafter.blogspot.com/

Have a great time crafting and thank you for checking us out.

Monday, January 16, 2017

Basic Pivot for Whirligig or Weathervane

Basic Pivot for Whirligig or Weathervane

    In this post I wanted to go into more detail about the whirligig or weathervane pivot and how it is put together. The diagram below is intended as a basic guide and can be adjusted in size or scale according to the size whirligig or weathervane that you're creating. 

    For basic demonstration purposes this is a basic 12 inch pivot for whirligig or weathervane. Were using a heavy screw with threads that only go halfway up and a non-tapered shaft. The type of screw head does not matter as it will be cut off once the screw is installed in the vertical mounting board. Screw the screw into the vertical mounting board just enough to cover the threats. Making sure to keep shaft of screw vertical. It may be necessary to drill a pilot hole to help keep the screw straight, as this is what your project is going to pivot on. This should leave the upper half of the screw without threats exposed. Then using a Dremel tool (with appropriate safety goggles and other protective equipment) use a cutoff blade to cut off the screw head and a grinding bit to either round the top of the screw shaft or grind a concave dimple. Once you've completed your vertical board with pivot it is time to create the horizontal part of your pivot. 
    One of the important things to take in consideration before drilling a hole is the metal or plastic sleeve that will fit inside the hole. The metal or plastic sleeve should fit tightly in the hole but the screw should fit closely but not so tight as to inhibit the upper part of the pivot from rotating. Any wobbling in the rotation of the upper pivot will simply create excessive wear and erratic movements.
    At the bottom of the hole place a 1/4" hunting shot (slingshot ammo found in the sporting good section) or a small ball bearing, or BB depending on the size hole being used for the vertical shaft. The basic reason for placing the metal ball at the bottom of the hole is to prevent metal rubbing against wood and to reduce friction as the upper pivot rotates. Using a metal ball that is slightly larger than the metal or plastic sleeve and then placing the metal sleeve on top of the metal ball in the hole will help keep the metal ball in place.
     Using wood stock that is approximately 1/2" X 1/2" X 12" long measure 3 inches from one end and drill a hole.  Where you position the whole will depend on how you want the pivot to react to the wind. The closer you position the hole to the center, the more erratic the pivot will act. The closer to the end you position the whole the greater the force that will be applied not only to the pivot reacting to the wind, but also to the pivot itself. I have found that a quarter of the total distance gives a good balance to the pivot and does not put excessive strain on the pivot. 
    Once you have the metal ball and sleeve in place the two parts to the pivot should be ready to go together. You can put a small amount of graphite lubricant at the bottom of the hole before you put the two together. 

There you have it a basic pivot to mount your whirligig or weathervane on. For this and other ideas please be sure and check out our website www.nevadacrafter.com and our blog's at http://craft44.blogspot.com/ and http://nevadacrafter.blogspot.com/ and http://3dpenideas.blogspot.com/
    If you have any questions please be sure and post those questions to the blog and I will try to answer them as promptly as I can.

Tuesday, January 3, 2017

Lubricating whirligigs and other mechanical projects

Lubricating a whirligig or mechanical project with moving parts.

    Lubricating whirligigs or mechanical projects can be a challenge. The materials you work with can vary from metal to wood and even plastic. Add to this a project that is exposed to the outdoor elements, wind, rain, dust, dirt and even the unexpected squirrel.
    The basic challenge is to keep moving parts moving and there are a few basic rules that you need to consider when you're creating mechanical art.
    The first rule of thumb that I was taught long ago, is to always try and work with like materials. Putting a moving metal part against a wooden part will always result in the wooden part eventually being worn away. Putting plastic or nylon parts in between will help lengthen the life span of your mechanical wonder, but will have to be periodically replaced. And always try to keep lubricated parts sealed when possible. Always use washers and spacers when possible to keep metal parts from rubbing against wooden parts. 
    As for the lubricants themselves, my go to lubricant has always been a pencil. The graphite used to make the pencil lead makes a perfect lubricant. Rubbing a pencil lead on a propeller shaft works wonders and is resistant to most weather conditions. Liquid graphite can also be used when you have metal to metal surfaces, such as brass tubing and brass welding rods used for propeller shafts or other metal to metal parts. 
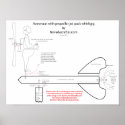
    As you're creating these projects you should always keep in mind to create projects that can be disassembled. This will make it easy for the owner not only to periodically lubricate moving parts but also make any repairs or replace any worn parts that need replacing. Another option is to also include in your projects lubricating holes, as shown in the diagram above. These are holes or tubing that allow you to lubricate the moving part without disassembling and are usually mounted on the bottom side prevent collecting dust or water. 
    White lithium grease is also an optional lubricant. Normally used on bike chains and other outdoor moving parts such as door hinges. It also is extremely weather resistant and has the added advantage of being in a spray form. 
    The next lubricant is actually a solid and usually in the form of nylon washers. But as I have found over the years nylon washers and metal bearings can be very expensive to use. Using crazy straws and washers cut from milk jugs will work but keep in mind most plastics are designed to be biodegradable and may not last very long if exposed to sunlight. Crazy straws dipped in a pot of boiling water will immediately straighten and as long as they are cut to length and hidden inside the whirligig or project they will last quite a long time. Add some graphite lubricant and they will undoubtedly outperform most expectations. Also keep in mind when using plastic or even brass tubing you will want to keep the sizes close fitting. A loose moving part will wear much faster.
   
    I hope these tips on lubricating your mechanical art are of help. Please be sure and visit our website www.nevadacrafter.com for more tips and ideas on your next craft project.

Thursday, December 22, 2016

Dragon shelf bracket with hook

Dragon shelf bracket with hook

So this is a different take on the previous shelf bracket concept. The basic shelf bracket can be adapted to just about any theme. Using a scroll saw you can cut out just about any character for that one-of-a-kind bookshelf. Again I recommend that it be cut out of a material similar to Masonite or plywood that does not have a wood grain. This is so the tail can withstand the extra stress that may be placed on it. If you're only planning to hang lightweight items off of the tail then I would go ahead and use 1/2" or 3/4" wood stock. Again the amount of weight that the hook can withstand greatly depends on how the grains in the wood run. The shelf on top of the bracket will set high enough to protect the horns from being broken off or snagging items on them.
     I created this design for someone I know that loves to read fantasy books and I hope that you will love this design as much as I do. 


Please be sure to check out our web site www.nevadacrafter.com and also http://craft44.blogspot.com/ and http://nevadacrafter.blogspot.com/

Friday, September 23, 2016

Halloween flying bat mobile

Halloween flying bat mobile

 If it is done right it's a pretty cool project. A light tug on the pull string and the bat will appear to be flying. It makes a really cool decoration and center of conversation . The entire project is held together by chords or heavy string and works something like a marionette. NOTE: it should not be hung over a crib and should be kept out of reach of small children as the chords and strings can become a choking hazard!
   First drill your preliminary holes and attach the wings to the body using your chosen cord or string. Making sure that the corridor string you choose is heavy enough to support the weight of the project. Start with a ring or loop at the top, add four strings of equal length. (Length is about 18 to 24 inches )  Run two strings on each side of the bat through slits cut in to the dowel and use a dowel to keep your strings separated. You should now have two strings on each side of the dowel for the wings. The most difficult thing about a project like this is finding the right balance points. Adjusting the weight in the pull cord is usually the easiest but in some cases you may have to move the cord holes that support the bat. The two outer holes can be moved closer to the body if the body is too heavy or move them slightly further out if the wings are too heavy. Before painting and finishing your project it is best to do a trial run with everything assembled temporarily. If it is done correctly it should be balanced as shown above in the small diagram. Holes drilled in the wrong place can be filled in with putty or glue and sawdust. Be sure and take notes of where the correct balance holes are if you intend to make more than one .The body can be sanded down to remove some weight or a thinner wood stock can be used. Basically the body should equal the weight of the two wings. Metal washers can be sandwiched In between two pull cord bats or a thicker one that is hollowed out if extra weight is needed for the body. The pull cord bat is actually optional and should be included with the total body weight if used.
    Once you have your project balanced you can then proceed to paint your project. Keep in mind to use an equal number of coats of paint for both the wings and the body so as not to throw your weights off.
    One of the nice things about this project as it uses a single color paint with only a few highlights as desired. Can use plastic animal eyes to make it more realistic or paint a couple of thumbtacks.

 NOTE: If you want to make a quick trial mobile, it can be made out of cardboard or poster board.

    In the poster board bat I had to move the holes for the wings out further to accommodate the width of the pencil length dowel. I used paperclips on the wings to adjust the balance. This way once I have the weight correctly adjusted I could simply insert the paperclips into the foam part of the wings Instead of using the small bat on the pull cord I used beads as a counterweight. That is so I can add or subtract however many beads I needed to. I also used beads on the underside of the wings to keep the embroidery thread from pulling through.
     The size and type of material will always cause you to make adjustments in the location of the holes, the weights in the wings, and the counterbalance on the belly (pull cord beads). This is why you completely assemble your project. Paint, eyeballs and anything else you add to the project also adds weight.
    Once you have made all your adjustments and have decided on all the materials that you're going to use, it is a good idea to make notes and adjustments to your pattern. That way any copies you build in the future will be simple and easy.


    As always it should be noted that this prototype design is the property of Nevada crafter.com it is free to the public to use so long as it is not put into mass production. (Anything over 500) please also note that this post is copyrighted and Nevada crafter does not allow reprint, redistribution or republishing without permission from Nevada crafter.com

Tuesday, August 23, 2016

Cloud rainbow sign with whirligig umbrella - sign is optional

This is a cloud rainbow whirligig umbrella that can be used as a business sign or address sign. The whirligig part of this is unusual in that it is a hanging whirligig. You must make sure to mount the fan blades of the umbrella at an angle for it to work properly. As with many of my other designs, this is a concept design and has not been tested or prototyped as of yet. The design is set up so that you can scale it to whatever size you need. Keep in mind that if you make the whirligig too large it may not work mechanically. The eye screws may have to be mounted differently than shown to offset the weight of the umbrella and rainbow. The left eye screw should probably be on the rainbow above the umbrella. You may also want to scale the umbrella down in size.
    It should also be noted that the umbrella by its self is a whirligig and can be used alone without the cloud and rainbow.

Friday, July 29, 2016

Steampunk whirligig / weathervane by Nevada crafter.com

    This is probably the most complicated whirligig design that I have created thus far. And as such I would like to stress that this is an untested design that may be better suited as a decoration indoors rather than an actual functioning whirligig or weathervane.
    The reason for the complexity is that it uses several different materials that are not usually incorporated into a whirligig. The design is a steam punk style and uses everything from wire, tubing and even wiremesh.
    I think it would look really cool using a copper mesh for the netting. The balloon itself is a simple oval 1/4" cut out painted gray to resembled the dirigibles used during the Victorian era. The guide wires or ropes will need to be some type of rigid wire such as brass welding rod or even bicycle spokes to support the balloon. Steam generator in the middle can be part wood but also could be just as easily fashioned out of a metal cut out. Tubing could be substituted with copper or brass wire. The steam gauge itself can be a sliced dowel painted silver and then applying a decal for the gauge and numbers. The ship body is cut out of 1/2" to 5/8" wood stock. The propeller is actually quite simple, in that it is a dowel using beads as a spacer and cap.
    The rest of the design is left open for your own imagination, such as the type and style of anchor that you wish to use or whether you would want to add any ports. I personally thought about drilling a hole in the side and then mounting glass marbles as port windows. You could probably use pipe fittings or even Sculpey clay for copper or brass fittings.

   If you have any suggestions or ideas please feel free to post them in the comment section. I'd be very interested in hearing people's input so I can make improvements on the design or future designs.

Please be sure and check out our website www.nevadacrafter.com and also check out our other blogs.
http://nevadacrafter.blogspot.com/

http://craft44.blogspot.com/

http://3dpenideas.blogspot.com/


Monday, July 25, 2016

Top View Dragonfly

Top View Dragonfly

This is a public domain free to use dragonfly pattern created by Nevada crafter.com 

    This is a basic design that could be used or adapted to just about any project. From woodworking to 3-D pen's this simple design could be turned into anything from a whirligig to a simple stained-glass ornament,
or even a wire framed pendant.
    Basic designs like this are a good starting point and can be added onto with other designs or used simply by itself. 

Wednesday, June 29, 2016

Dragonfly weathervane

Dragonfly weathervane concept design


This is an untested design, so adjustments and alterations may be required. It is a basic design that could be altered so that a propeller could be added if you wanted to turn it into a whirligig. The pivot pin has been mounted as far forward as possible so that the dragonfly is always flying into the wind. It may be necessary to move the pivot pin slightly back for added strength depending on average wind speeds. Here in Nevada wind speeds can gust upwards of 60 miles an hour or more and may require that the wings be mounted more flat or even a downward slant to prevent dragonfly from being blown off the pivot post.
Although this design is presented for entertainment purposes it could quite easily be used as a pattern to create the actual weathervane.

Be sure and check out our website and other blogs for additional ideas and concepts.

www.nevadacrafter.com

http://craft44.blogspot.com/

http://nevadacrafter.blogspot.com/

Friday, June 17, 2016

FREE Mandala pattern

     Although some of my patterns I do reserve copyrights, this one in particular I decided to make public domain. This particular pattern is free to use however you see fit. It is one of my first attempts at a Mandala.


Monday, May 23, 2016

Rocket astronaut jet pack whirligig

Rocket astronaut jet pack whirligig design

This is a concept design by  Nevadacrafter.com  
As I've stated before this is an untested design. But I wanted to include something new with this design, so I've made available a 16 x 12 print out that can be purchased from the following. 

Astronaut jet pack whirligig design poster
Astronaut jet pack whirligig design poster by Nevadacrafter
View Conceptual Posters online at zazzle

    The astronaut can be made fixed mount, but I think it adds additional character if he can wobble back and forth. The tail propeller is optional, but be sure and mount your propeller blades at an angle. The design can be modified in a number of ways, just use your imagination and give it a try.

Monday, May 16, 2016

Ladybug push car for toddlers


     This is a simple push car design for toddlers. As this is an item that may be handled by a toddler, you must make sure that all parts are non-toxic, no sharp edges, no toxic glues or finishes and nothing is small enough to swallow. If the spots on the body are to be drilled instead of wood burned make sure the holes are too large or too small for little fingers to get stuck in.

Be sure and checkout our web site www.nevadacrafter.com hear you will also find links to our other blogs and youtube videos.

Monday, May 9, 2016

Black widow spider silhouette

Black widow spider silhouette


black widow silhouette Note:

This image is impregnated with visible and encoded watermarks.

black widow spider silhouette
This design is copyrighted by Nevadacrafter.com 2016 and not to be reprinted, redistributed or republished in any other format without the consent of Nevada crafter.com. This pattern is free for you to use for your personal use only. And not to be used for mass production of any kind. 

 The silhouette makes a great Halloween cut out for a yard decoration, business sign or if you're just into the spiders.

Wednesday, April 27, 2016

Contest for Nevada Crafter month of May

Nevada Crafter month of May contest

For your chance to win these 3 glass lampwork charms, great for making necklaces , bracelets or wine glass charms, all you have to do is follow or like us on one of the following.

Free Patterns and Ideas Blog

Craft 44 blog

Nevadacrafter blog


For future contests be sure and check out these sites and http://www.nevadacrafter.com

we are a Free Nevada Crafter online magazine

Friday, April 22, 2016

Cat Watching Flower Whirligig Concept

Cat Watching Flower Whirligig Concept


Note: make sure flower petals are angled to form a propeller. It should also be noted that this is not a pattern but a concept as the drawing was not done to scale.


Friday, April 15, 2016

Carnival Ferris wheel whirligig

Carnival Ferris wheel whirligig

Note this is a concept and not a pattern. All copyrights are reserved by Nevadacrafter.com you are free to use for personal use only, not for reproduction, reprint, or republication.


This concept has not been done to scale and has not been tested and as such functionality is unknown. Theoretically, it should work but may require adjustments and further testing.


The idea is to use a double wheel as the Ferris wheel with the propeller blades inside the Ferris wheel. The cars on the Ferris wheel may require additional weight in order to get them to hang and rotate properly. The shaft that the propeller rotates on probably should be a metal screw or bolt. Be sure to use graphite as your lubricant so it does not freeze in the winter. Graphite from pencil lead may be substituted. The center hub is a 1"or 2" wheel in which the propeller blades are inserted into. The upper edges of the blades are slotted into the Ferris wheel and act as spokes for the Ferris wheel. The dowels that the cars rotate on also act as further reinforcement for the Ferris wheel itself. 
    Please leave constructive suggestions and ideas in the comments section. 

For this and other craft ideas please checkout our other sites and be sure to subscribe.
www.nevadacrafter.com

http://craft44.blogspot.com/

http://nevadacrafter.blogspot.com/

Nevada Crafter on YouTube

Wednesday, March 30, 2016

Whirligig music box, Or a whirligig that plays a music box.

This is a whirligig prototype concept project in the making that plays a music box.

I have thought about using a rubber grommet to regulate the speed of the propeller, but that would mean the music box would most likely only play at certain wind speeds and would still not prevent it from playing too fast. There is the possibility of using a flywheel but not exactly sure how that would work out. If any of you out there have any ideas please post them in the comment section and I will try to respond in a timely manner. from Nevadacrafter.com Thank you

For this and other craft ideas please checkout our other sites and be sure to subscribe.
www.nevadacrafter.com

http://craft44.blogspot.com/

http://nevadacrafter.blogspot.com/

Nevada Crafter on YouTube

Tuesday, March 22, 2016

Tap dancing whirligig

Tapping shoes whirligig

Note: tapping shoes whirligig is presented as a concept idea. It has not been done to scale nor has it been tested. Nevada crafter.com does not guarantee that this concept will work and is presented here only for entertainment purposes. Nevada crafter also retains all copyrights and does not allow the reprint publication of this document for the purpose of resale. The whirligig may be used for personal and smallbatch production only. Corporate mass production is not allowed. 


 The alternating cams lift the shoes one at a time and then drops them. The bottle caps on the bottom of the tip of the shoe rattle each time the shoe is dropped making a tap dancing sound. It may be necessary to place a metal bracket under the bottle caps in order to prevent damage  to wood and to add to the sound effect.The shoes are hinged at the back with a small drawer hinge. A small metal bell can be optionally attached for additional sound. The style of the shoe could also be changed to give it a man's shoe opposite a woman's shoe to give it more of an appearance of a couple dancing.The tail fin and propeller are presented only as examples and could be customized to fit the theme as well. As I do not know how noisy this whirligig may be, it may work better as a scarecrow in the garden than a yard ornament.


 The idea for this whirligig came from the love my mother had for tap dancing. As she could not get me to take lessons I hope that this whirligig idea will please her and so I dedicate this post to her.


    For this and other craft ideas please checkout our other sites and be sure to subscribe.
www.nevadacrafter.com

http://craft44.blogspot.com/

http://nevadacrafter.blogspot.com/

Nevada Crafter on YouTube

Saturday, March 19, 2016

Need a puppet kitty cat?

Mechanical puppet kitty cat


The concept puppet kitty cat below presents the inside workings of this design. The proper location of drill holes and pivots points have not been determined. They are approximations and should not be relied on, as this is not a tested pattern. 

The design below are the parts that need to be cut out.


It should be noted that this concept and idea can be adapted for use with a whirligig.

Be sure to leave any constructive comments or suggestions in the comment box.
Also be sure to check out her other blogs and other posts and please subscribe.

Revisions may be made at a later date

For this and other craft ideas please checkout our other sites and be sure to subscribe.
www.nevadacrafter.com

http://craft44.blogspot.com/

http://nevadacrafter.blogspot.com/

Nevada Crafter on YouTube